前言
使用原生微信小程序的movable-area实现拖拽排序以及菜单的新增、删除、预览等,类似支付宝首页顶部应用的效果。
效果预览
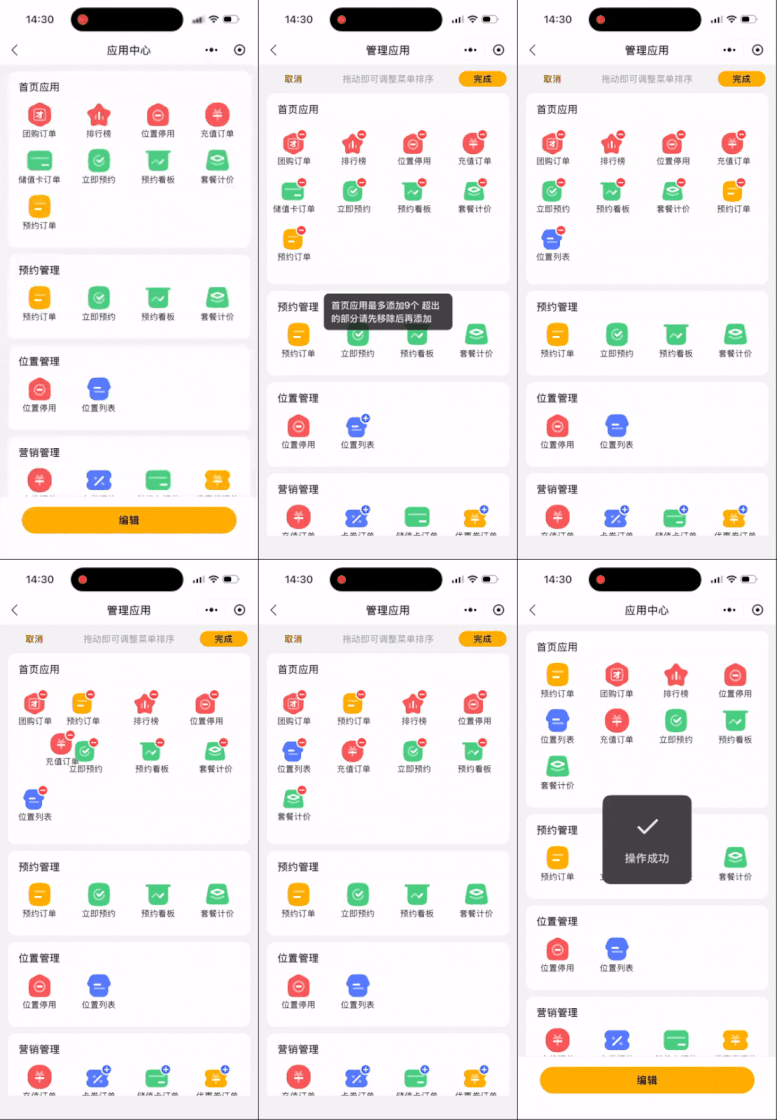
小程序首页展示默认的9个菜单应用+更多按钮,点击更多进入所有应用页,在此页面可以对应用进行添加、删除和拖动排序,页面上方是操作区,下方是各种分类下的应用,点击编辑时仅可在操作区进行拖动排序。点击完成保存编辑结果,点击取消恢复到操作前。
实现步骤
首页应用区的静态页面实现
 1
 2
 3
 4
 5
 6
 7
 8
 9
10
11
12
13
14
15
16
17
18
19
20
21
22
23
24
25
26
27
28
29
30
31
32
33
34
35
|
    <view class="category-card">
      <view class="category-title">首页应用</view>
      <!-- 非编辑模式:预览 同页面底部应用区一致 仅作展示 -->
      <block wx:if="{{!editMode}}">
        <view class="menus-container">
          <view class="single-menu" catchtap="handleIndexMenu" wx:for="{{indexMenus}}" wx:key="path" data-path="{{item.path}}" data-active="{{item.active}}">
            <image wx:if="{{!editMode}}" src="{{item.icon}}" class="menu-icon" />
            <image wx:elif="{{item.active}}" src="{{item.icon_del}}" class="menu-icon" />
            <image wx:else src="{{item.icon_add}}" class="menu-icon" />
            <view class="menu-title">{{item.name}}</view>
          </view>
        </view>
      </block>
      <block wx:else>
        <view class="container">
          <movable-area class="item_box" style="width: {{boxWidth}}rpx;height: {{boxHeight}}rpx">
            <movable-view class="item {{selectId === item.resourceId?'item_show':'item_hide'}}" wx:for="{{swipeItem}}" wx:key="path" x="{{item.x}}rpx" y="{{item.y}}rpx" direction="all" bindchange="touchMove" bindtouchend="touchend" data-index="{{item.index}}" data-id="{{item.id}}" bindtouchstart="unlockItem">
              <image wx:if="{{!editMode}}" src="{{item.icon}}" class="menu-icon" data-path="{{item.path}}" data-active="{{item.active}}" catchtap="handleIndexMenu" />
              <image wx:elif="{{item.active}}" src="{{item.icon_del}}" class="menu-icon" data-path="{{item.path}}" data-active="{{item.active}}" catchtap="handleIndexMenu" />
              <image wx:else src="{{item.icon_add}}" class="menu-icon" />
              <view class="menu-title">{{item.name}}</view>
            </movable-view>
          </movable-area>

          <view class="item_box layer_box" style="width: {{boxWidth}}rpx;height: {{boxHeight}}rpx">
            <view class="item layer_item {{selectId == item.id?'item_hide':''}}" wx:for="{{layerItem}}" wx:key="id" style="left: {{item.x}}rpx;top: {{item.y}}rpx">
              <image wx:if="{{!editMode}}" src="{{item.icon}}" class="menu-icon" />
              <image wx:elif="{{item.active}}" src="{{item.icon_del}}" class="menu-icon" />
              <image wx:else src="{{item.icon_add}}" class="menu-icon" />
              <view class="menu-title">{{item.name}}</view>
            </view>
          </view>
        </view>
      </block>
    </view>
|
对于编辑模式下的菜单页面设计,使用了两个图层。layerItem是没有被拖动的菜单项,作为拖动菜单的背景层;swipeItem通过数组遍历生成多个可以拖动的菜单项。当用户按住某个菜单时,隐藏固定层中的该菜单的显示。
对于拖动元素moveable-view,当用户按住某个菜单的时候会触发unlockItem,
1
2
3
4
5
|
  unlockItem(e) {
    this.setData({
      selectId: e.currentTarget.dataset.id,
    });
  },
|
滑块拖动和页面排序
计算单个菜单格子的宽度
1
2
3
4
5
6
7
8
|
data: {
    // 750 - 48 内边距
    boxWidth: 702, //容器宽度,100%为750,单位rpx
    boxHeight: 0, //容器高度
    height: 140, //滑块总高度,即滑块本身加上边距的高度
    selectId: 0, //当前选中滑块的id
    col: 4, //滑块列数
}
|
1
2
3
4
5
6
7
8
|
touchMove(e) {
    let {
      boxWidth,
      height,
      layerItem,
      col
    } = this.data;
    let width = Math.trunc(boxWidth / col); //每块区域的宽度
|
当用户手动进行拖动时,判断菜单当前到了哪个位置,修改key值
 1
 2
 3
 4
 5
 6
 7
 8
 9
10
11
12
13
14
|
if (e.detail.source === "touch") {  //区别于其它原因造成的位置变化 比如:由于惯性继续移动,超出范围自动回弹等
      let arr = [...layerItem];
      let id = e.currentTarget.dataset.id;
      let centerX = e.detail.x * 2 + width / col; //当前选中滑块的中心的x坐标
      let centerY = e.detail.y * 2 + height / col; //当前选中滑块的中心的y坐标
      let key = 0; //滑块滑动时 菜单当前应该移动到的新位置
      let index = 0; //滑块滑动前 的位置

      //通过id判断当前滑块的index
      layerItem.forEach((item) => {
        if (item.id === id) {
          index = item.index;
        }
      });
|
 1
 2
 3
 4
 5
 6
 7
 8
 9
10
11
|
//根据当前滑块位置确认当前所处在哪个区域
for (let i = 0; i < arr.length + 1; i++) {
        let x1 = (i % col) * (boxWidth / col); //第n个区域的左 x坐标
        let x2 = ((i % col) + 1) * (boxWidth / col); //第n个区域的右 x坐标
        let y1 = Math.trunc(i / col) * height; //第n个区域的左 y坐标
        let y2 = Math.trunc(i / col + 1) * height; //第n个区域的右 y坐标
        //判断当前滑块所属区域
        if (centerX > x1 && centerX < x2 && centerY > y1 && centerY < y2) {
          key = i;
        }
      }
|
1
2
3
4
5
|
// 当拖动到最后一个菜单之后的空白区域时,key 超过最后一个有效下标
// 比如6个格子 数组长度是5 拖动到最后一个格子 但是key应该取5
if (key >= arr.length - 1) {
    key = arr.length - 1;
}
|
调整菜单整体新的顺序
 1
 2
 3
 4
 5
 6
 7
 8
 9
10
11
12
13
14
15
16
17
18
19
20
21
|
//滑动时位置与滑动前不同时
 if (index != key) {
    //计算数组中其他数据变化后的index
    arr.forEach((item, i) => {
      if (item.id != id) {
        // 其它元素向前移动
        if (index > key) {
          if (item.index >= key && item.index < index) {
            item.index = item.index + 1;
          }
        }
        // 其它元素向后移动
        if (index < key) {
          if (item.index > index && item.index <= key) {
             item.index = item.index - 1;
          }
        }
      } else {
        item.index = key;
      }
    });
|
根据菜单新的索引值计算元素位置,并保存数据,更新页面
1
2
3
4
5
6
7
8
|
arr.forEach((item, i) => {
  item.x = (item.index % col) * (boxWidth / col);
  item.y = Math.trunc(item.index / col) * height;
});

this.setData({
    layerItem: arr,
});
|
最后,当停止拖动时 同步两组数据
 1
 2
 3
 4
 5
 6
 7
 8
 9
10
11
12
13
14
15
16
|
  /**
   * 停止拖动,两数组同步
   */
  touchend(e) {
    const arrayTemp = JSON.parse(JSON.stringify(this.data.layerItem));
    // 根据x,y值排序
    arrayTemp.sort((a, b) => {
      if (a.y === b.y) return a.x - b.x;
      return a.y - b.y;
    });
    this.setData({
      layerItem: arrayTemp,
      swipeItem: arrayTemp,
      indexMenus: arrayTemp,
    });
  },
|
源码链接
有帮助的话 请点击star
